Instructions to calibrate a UHP pipette:
WARNING: Performing a calibration adjustment on any pipette should always be the last resort. Visual and performance confirmation that the internal seal, o-ring, piston assembly, lubricant (as applicable), shaft assembly, and other vital pipette parts that impact the accuracy and precision performance of the pipette must be in good/optimal working condition. Failure to recognize and replace worn parts could have an impact and shorten the life span of the pipette, possibly leading to costly repairs. Performing a calibration adjustment without confirmation of good pipette parts is a short-term solution at best.
Equipment Needed to Calibrate a UHP Pipette
- VWR UHP Pipette and 4-5 place analytical balance
- Calibration Tool: LN SP19674
- Calibration Concealment Decal
Optional Equipment:
- Latex gloves
- Small-bladed tool for removal of the calibration concealment decal
- Kim wipes and 70% IPA: Used for wiping the pipette externally after calibration adjustment is completed
Printable Calibration Log
Printable Calibration Stickers (for use with Avery 5960 labels)
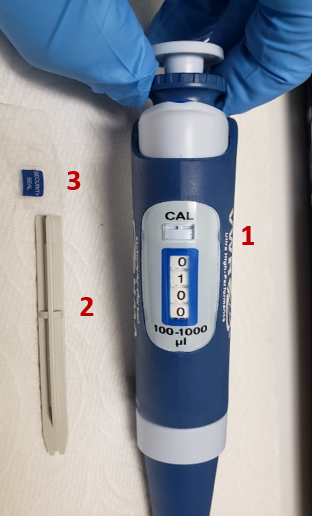
Step 1:
Set the pipette volume display to the 10% volume (i.e., for a 1000uL pipette, set to 100uL, see figure 1).
Note: It’s strongly recommended to perform any calibration adjustment at the 10% volume. This is where most pipette manufacturers perform their calibration adjustments due to linearity and uniformity (i.e., accuracy and precision).
Performing a calibration adjustment at any other volume than 10% may have a greater impact and skew the volume aspirated and dispensed at different volumes.

Step 2:
Remove the calibration concealment decal (#1) with a small-bladed tool. Lay aside for re-installment later. See figure 2.0
Important Note: Verify that the two calibration switch indentations (#3) beneath the word CAL on the pipette body is in the down position, as shown in figure 2.0. If found in the up position, push the indentations into the down position with the calibration tool (# 4, per figure 2.1) prior to executing step 3.
Step 3:
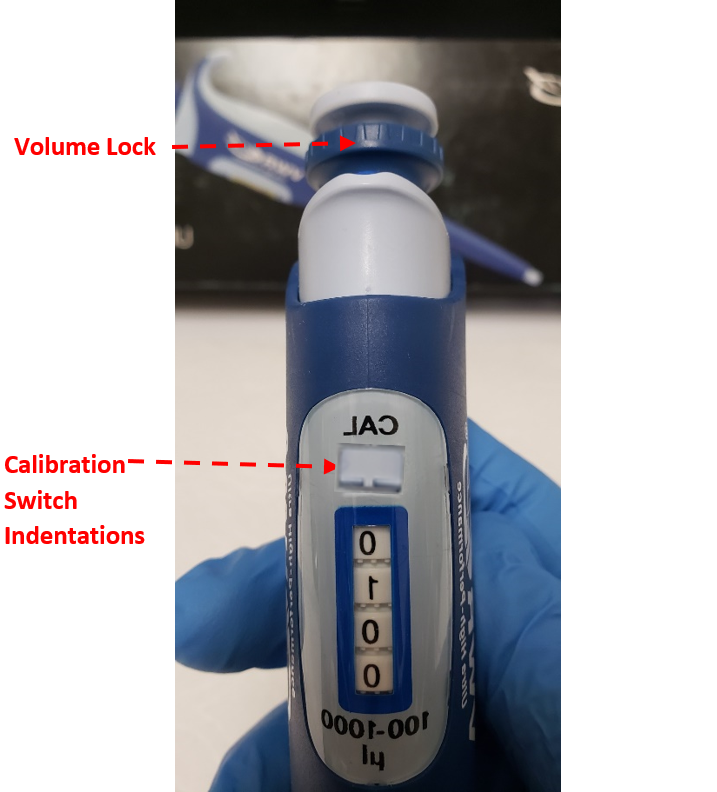
Pull the blue colored volume lock (#2) from the locked position (down position, see figure 2.0) to the unlocked position (up position as shown in figure 2.1.)
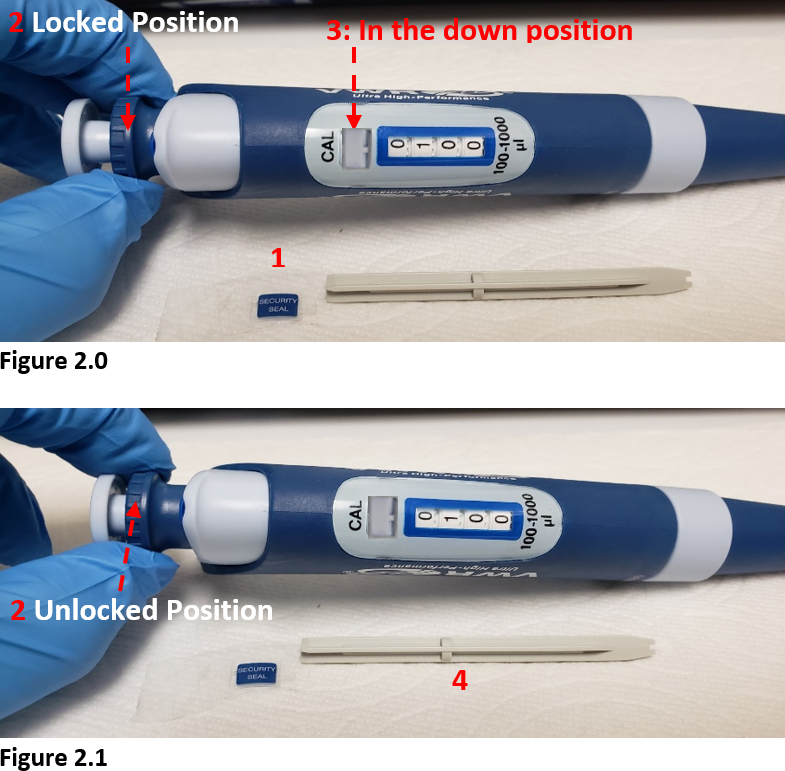
Step 4:
With the volume lock in the up position (unlocked), insert the calibration tool into the calibration switch indentations and move the indentations into the up unlocked position. See Figure 3.0
CAUTION: At this point, the pipette calibration mechanism is now in the unlocked position and vulnerable to any adjustments of the volume lock.

Step 5:
To adjust/calibrate the UHP pipette, Rotate the volume lock until the displayed volume matches the mean volume that was aspirated and dispensed.
Step 6:
Push the volume lock in the down position and calibration switch indentations back to the down position.
Step 7:
Check your calibration adjustments on a 4-5 place gravimetric balance. Repeat process until pipette is within acceptable tolerances for both accuracy and precision.
Step 8:
Reapply the calibration concealment decal to the pipette.
Disclaimer: Any action you take using the information on this website is strictly at your own risk. The information herein does not constitute professional advice and is general in nature. We make no warranty that this information will meet your requirements, be safe, accurate, or error-free. Pipette Supplies, Inc. is not responsible for any errors or omissions, any results obtained from the use of this information, or any loss or damage arising out of the use of this information. This site is for educational purposes only.
Fair Use: Copyright Disclaimer under section 107 of the Copyright Act of 1976, allows for “fair use” for purposes such as comments, criticism, teaching, scholarship, news reporting, and research.
Fair use is permitted by copyright statute that might otherwise be infringing.

