
The process of removing, replacing, and reinstalling the Pipet-Lite XLS push rod ejector assembly requires great care, a high attention to detail, patience, and steady hands. Please dedicate a good work area with good lighting and space where small parts can be located should they pop/fly out during disassembly. Pipette damage and lost parts may occur if attention to detail is not maintained. Please proceed at your own risk.
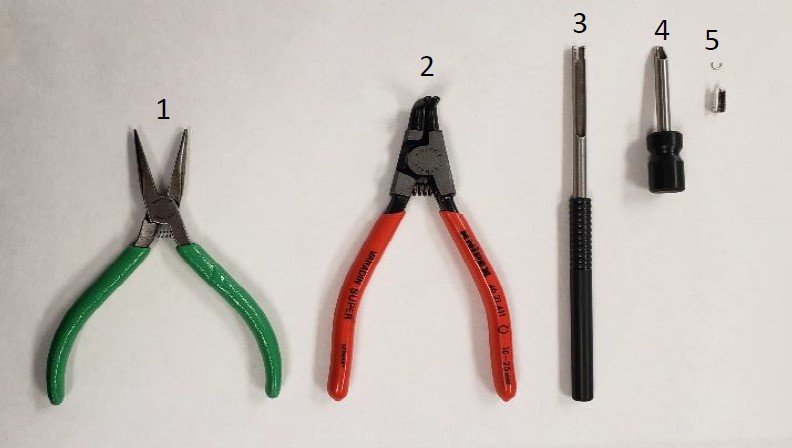
Recommended Service Tools
The following tools pictured here are highly recommended to properly service, repair, or replace the push rod ejector assembly, and/or internal volume assembly.
- Needle Nose Pliers
Catalog #: Source Locally - Bent Nosed Pliers
Catalog #: PS 10007 - C-Clip Installation Tool
Catalog #: PS 10005N - C-Clip Removal Tool
Catalog # PS 10006N - Replacement C-Clips
Catalog # PS 1555C (10pk)
Pipet-Lite XLS / XLS+ Ejector Push Rod Assembly: Part # RA 17012080.
These instructions are only applicable for the Pipet-Lite XLS and XLS+. If you have a Pipet-Lite (not XLS) you can find similar instructions here.
Push Rod Ejector Disassembly Instructions: PIPET-LITE XLS/XLS+
Step 1:
Press and hold down the tip ejector button for easier removal of tip ejector sleeve, as shown in Figure 1.0.

Step 2:
Firmly grasp the tip ejector sleeve and gently pull it in the opposite direction of the pipette handle/body, as shown in Figure 2.0. Lay a side for reassembly.

CAUTION: There is a spring and small parts under tension inside of the lower shaft assembly. Use caution as small parts may fly off when the lower shaft is separated from the pipette body.

Step 3:
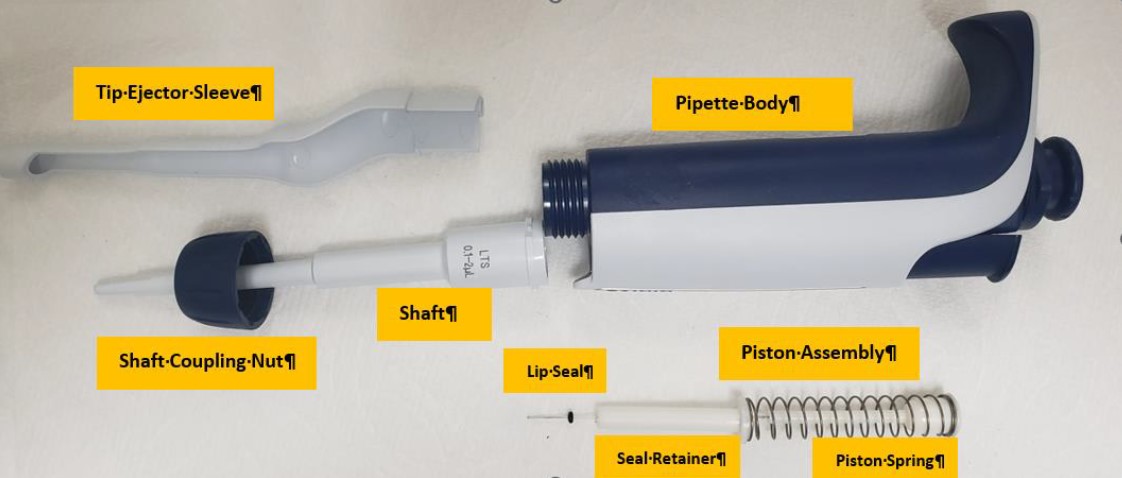
Gently unscrew the shaft coupling nut to separate the lower shaft assembly from the pipette body/handle. See Figure 3.0 & 4.0.
Lip Seal Lubricant Catalog # 2XLSGR55 used to lubricate piston assembly for pipettes with Lip Seals.

NOTE: At this point, routine preventative maintenance (PM) of the piston, spring, seal, o-ring, and shaft components can be performed, if desired.
Inspect, clean, lubricate, and/or replace the piston assembly as needed. Examine and replace the seal and o-ring as part of the PM. Inspect and clean the inside of the shaft, and/or replace as needed. Figure 5.0.

Step 4:
Press and hold down the tip ejector button to expose the lower point of the tip ejector rod, as shown in Figure 6.0.
Step 5:
Slide the C-Clip removal tool onto the ejector rod and firmly push it inward to contact the c-clip(s) that are attached to the ejector rod assembly. Push firmly and twist the tool to dislodge the c-clip(s). Figure 6.0. You may need to do this a couple of times before the clip comes off.
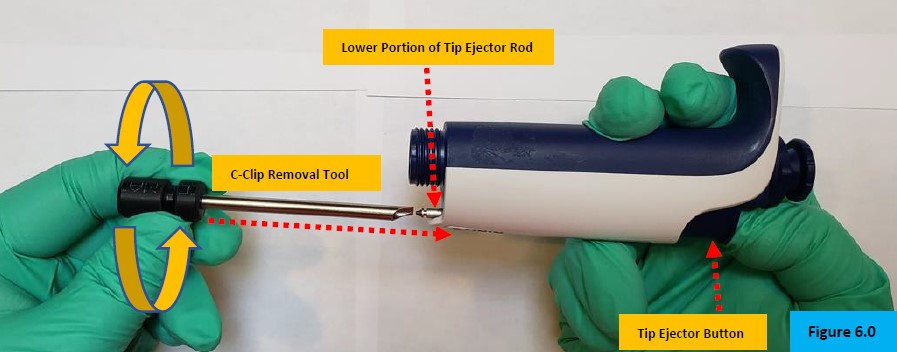
CAUTION: When the c-clips are removed, they may fly off and can easily be lost. Having extra c-clips on hand is highly recommended. Catalog #: PS 1555C (10pk)

Pipet-Lite XLS Push Rod Ejector Assembly – Removal & Access to the Volume/Counter Assembly
Step 6:
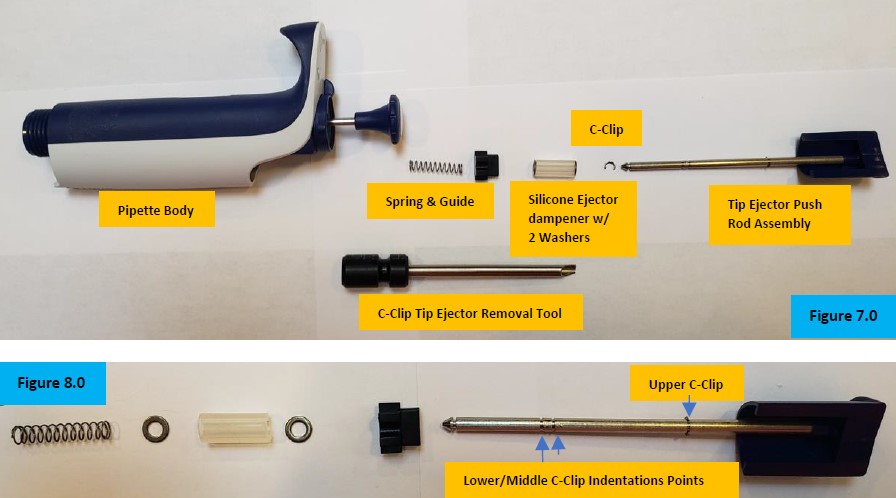
Grasp the tip ejector button and firmly pull upward to remove the tip ejector rod assembly from the top of the pipette body. Put aside for reassembly. Take notice of the parts and their orientation for reassembly. See Figure 7.0 & 8.0.
NOTE: Take notice of the lower, middle, & upper indentations where the c-clips will be re-installed later. Upper c-clip is installed for visual. Figure 8.0.
Step 7:
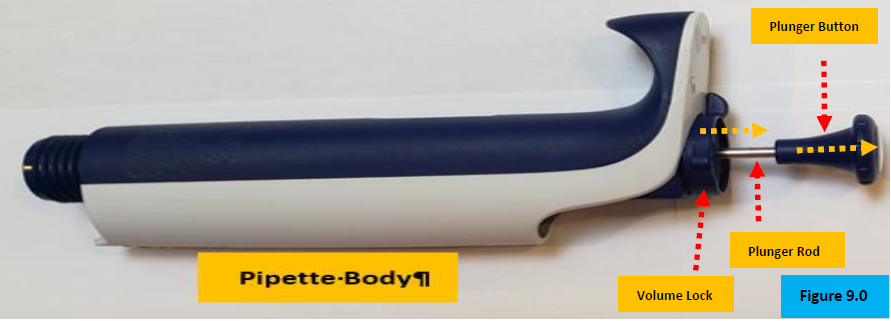
Grasp and firmly pull upward to remove the plunger button. Lay aside. Figure 9.0.
Step 8:
With a small-bladed, flathead screwdriver, gently pry up the volume lock wing to remove the volume lock. Lay it aside.
Step 9:
Unscrew fully and remove the volume lock bottom from inside the pipette body. Figure 10.0.

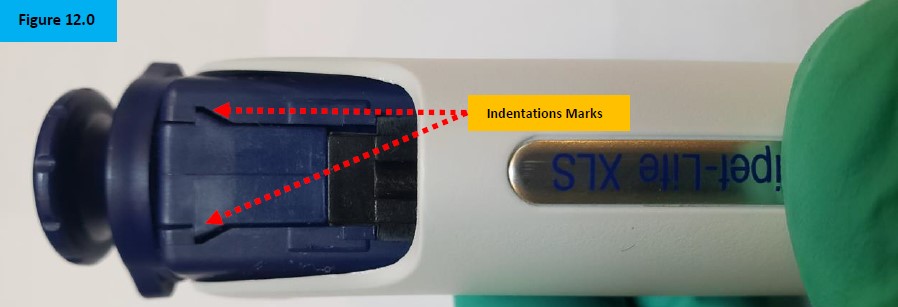
NOTE: Notice the points on the internal volume assembly. These indentations hold the internal volume assembly in place while under tension. These indentations will be spread apart with the bent nosed pliers to remove the internal volume/counter assembly from the pipette body. Figure 12.0.
Step 10:
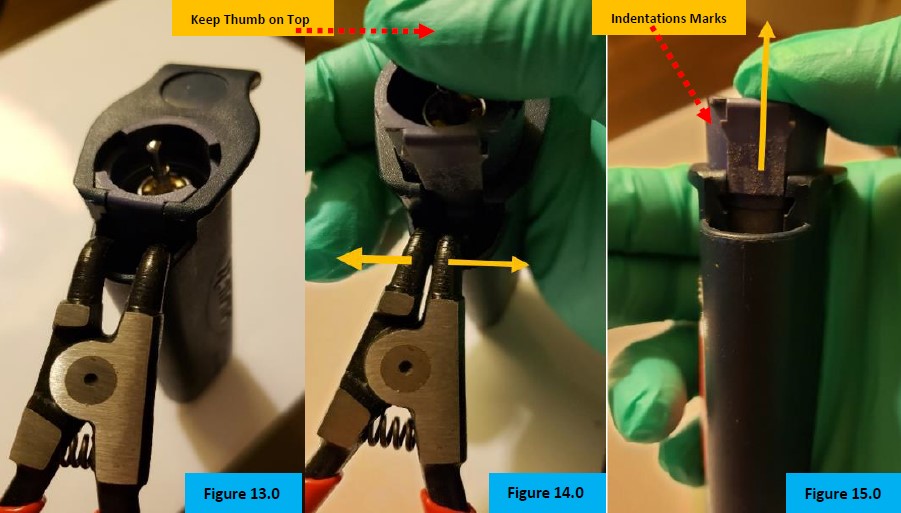
Insert the bent-nosed pliers into the opening vacated by the push rod tip ejector. See Figure 13.0.
CAUTION: Place thumb on top of the volume assembly prior to step 11. DO NOT REMOVE thumb or internal contents will fly out when step 11 is performed. Figure 14.0.
Step 11:
Gently squeeze the handle of the bent-nosed pliers to have the internal volume assembly pop out of the pipette. Figure 14.0.
Step 12:
Remove the bent-nosed pliers from the pipette body. Ejected Internal volume assembly is now accessible. Figure 15.0.
Step 13:
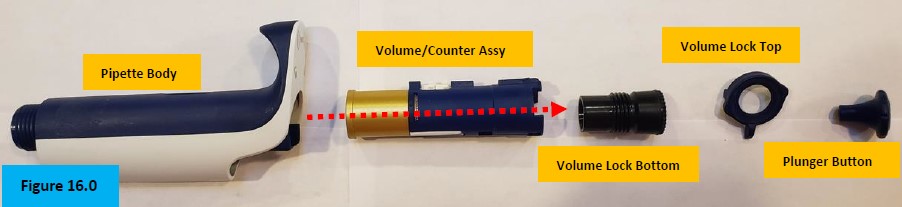
Slide the internal volume/counter assembly out of the pipette. Figure 16.0.
NOTE: The plunger button, volume lock, & volume lock bottom are shown for orientation purposes. The plunger rod and internal spring are not shown in Figure 16.0.
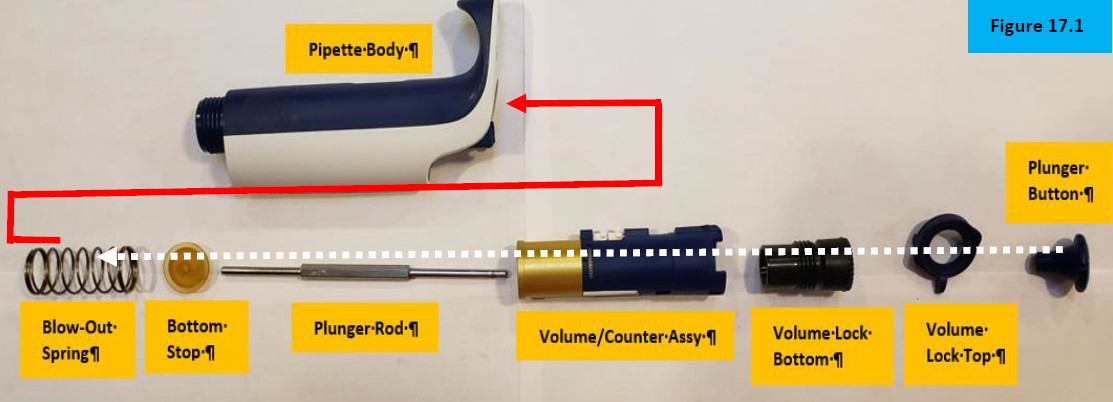
Step 14:
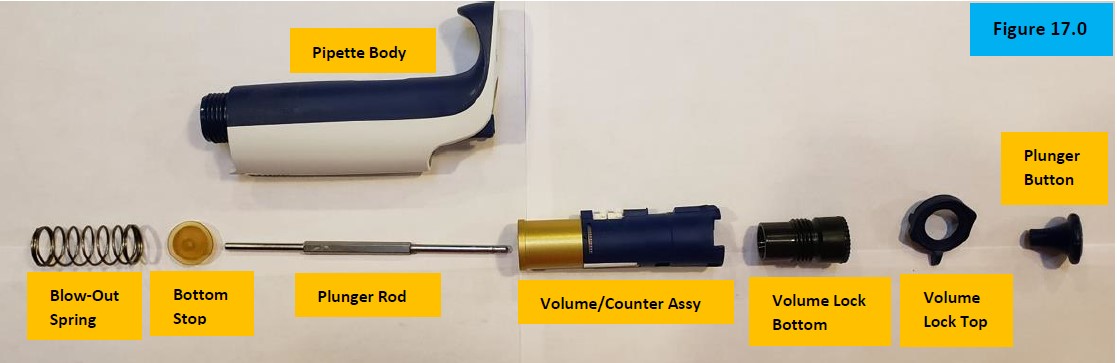
Slide out and remove the plunger rod, internal blowout spring, and bottom stop from the pipette body. Figure 17.0.
NOTE: Parts are displayed in their proper orientation for reassembly. Figure 17.0
Step 15:
Replace or repair internal volume assembly, plunger rod, bottom stop, and/or blow-out spring.
REASSEMBLY and Use of C-Clip Installation Tool
Step 16:
(1) Insert and screw the volume lock bottom back into the volume assembly.
(2) Insert the plunger rod back into the bottom opening of the volume assembly.
(3) Install the bottom stop onto the plunger rod.
(4) Install the blow-out spring onto the bottom stop.
(5) Insert these components into the pipette body opening, spring first.
(6) Install the volume lock top. Wait to install the plunger button until the lower shaft is installed back onto the pipette. Figure 17.1.
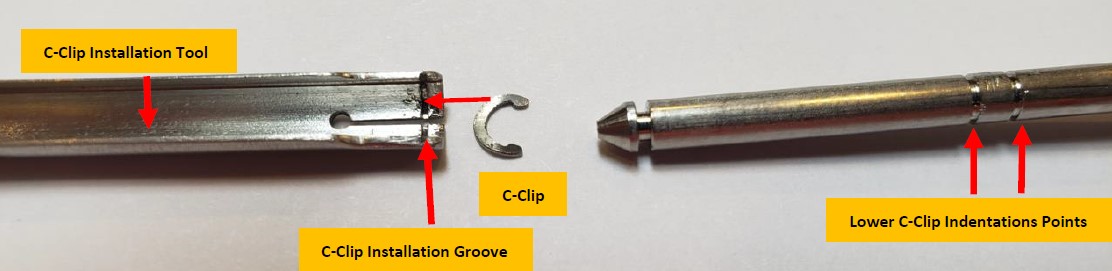
NOTE: Notice the c-clip and 3 indentation marks on the tip ejector rod. A minimum of 2 c-clips are needed for reassembly. The 3rd is optional and, on some occasions, is installed for additional support, or as a spare. Figure 18.0

Notice the indentation on the C-Clip installation tool. This is where the c-clip must be installed into for reassembly back onto the push rod ejector assembly.
** Step 17-19B will be completed after Step 22. They are shown below to illustrate the process and allow you to practice. Review these steps first and then return after step 22.**
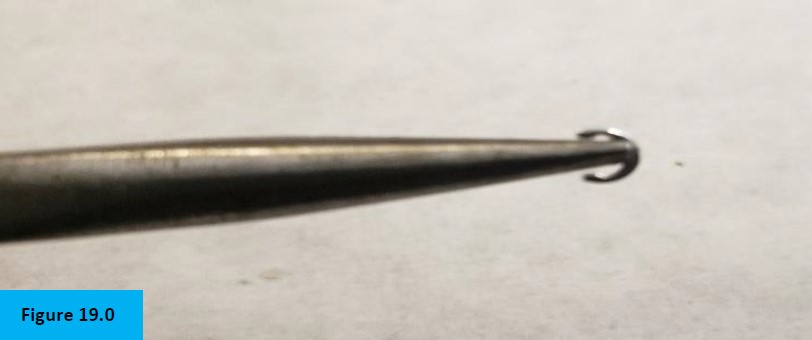
Step 17:
With your needle nose pliers, install the c-clip onto it as shown. Figure 19.0
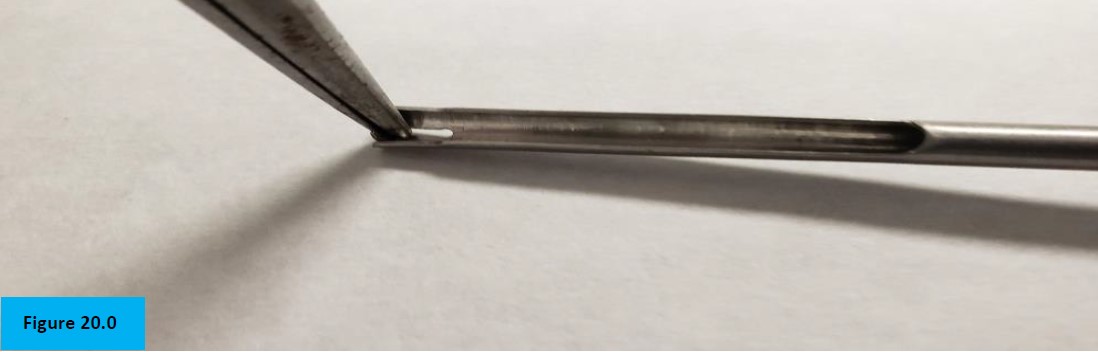
Step 18:
Insert the c-clip into the grooved indentation of the c-clip Installation Tool. Figure 20.0.
NOTE: This is being illustrated for easier viewing. Step would not occur until the push rod ejector assembly is reinstalled into the pipette body.
Step 19:
Slide the c-clip installation tool slightly past the middle c-clip insertion groove. Next, drag the tool gently backwards until the c-clip contacts the middle insertion groove. Snap the c-clip in place with the tool. Figure 21.0.
Step 19A:
Install another c-clip onto the c-clip installation tool as described in steps 17-18 above.
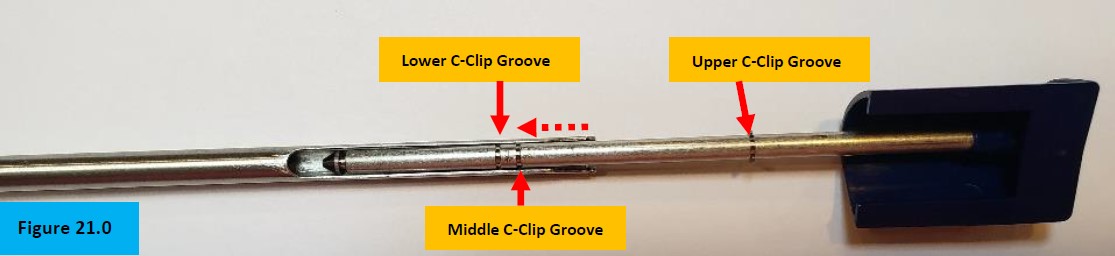
Step 19B:
Slide the c-clip installation tool to the lower c-clip groove and snap the c-clip in place. Figure 22.0.

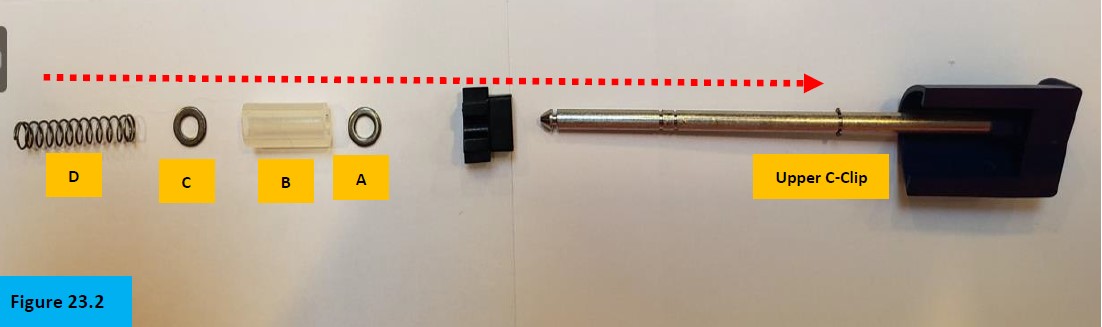
ONLY IF NEEDED: Figure 23.0, the upper c-clip can be re-installed only after the spring, 2 washers, silicone dampener, ejector guide, & lower/middle c-clips are removed. Figure 23.1.


Step 20:
Figure 23.2, Install part (A) onto the Pipet-Lite XLS push rod ejector until butted up to the upper c-clip. Install part (B), followed by part (C) until butted up next to part A. Install part (D) until butted up next to part (C).
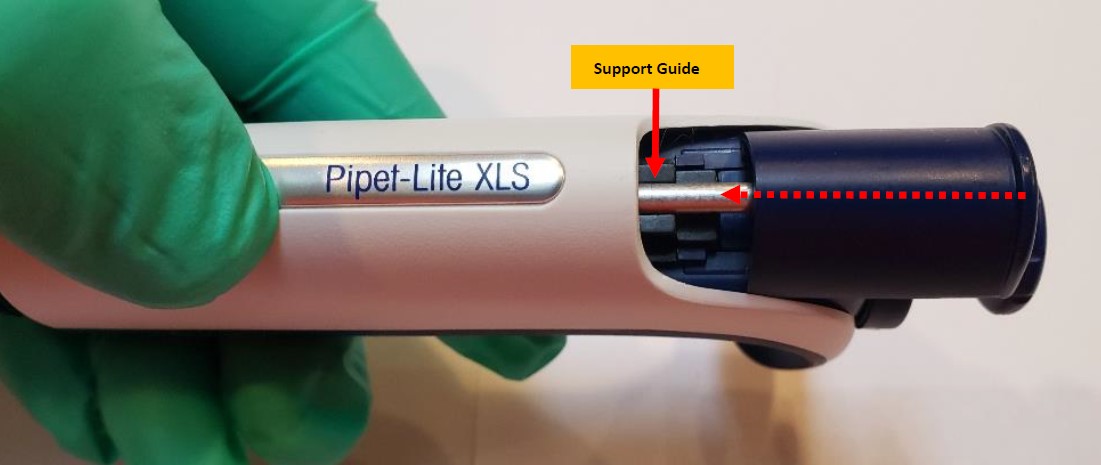
NOTE: The support guide will be installed just prior to inserting the ejector rod assembly back into the pipette body. Notice the orientation and how it sits in the body. Figure 24.0.

Step 21:
Install all components in order, as shown in Figure 23.2.
Step 22:
Just before inserting all components fully into the body, gently align and install the support guide to seat it, prior to pressing the tip ejector button down. When pressing the tip ejector button down, all parts will seat properly and then allow for the c-clips to be re-installed as stated in Steps 17 to Steps 19B. Figures 19.0 – 23.0.
Step 23:
Insert the piston assembly back into the shaft and screw the shaft coupling nut back onto the pipette body. Reattach the tip ejector arm back onto the pipette body. Reassemble the pipette liquid end assembly and allow to equilibrate for at least 60 minutes. Check functionality, accuracy, and precision performance on a 4-5 place balance. You have now completed the Pipet-Lite XLS Push Rod Ejector removal/installation instructions.
Related Posts:
Rainin Pipet Lite XLS/XLS+ and Pipet-Lite Models: Counter Assembly Replacement
Push Rod Ejector Assembly Replacement: Pipet-Lite, Pipet-Plus, EDP1, EDP3, Rainin Classic
Rainin Pipet-Lite, XLS, XLS+ Single Channel Pipettes: How to Perform Liquid End Assembly Preventive Maintenance
Rainin Pipet-Lite, Pipet-Lite XLS: How to Tighten a Loose Volume Lock Top
Seal/O-Ring Vs. Lip Seal for Pipet-Lite, Pipet-Lite XLS, and E4-XLS Models
Disclaimer: Any action you take using the information on this website is strictly at your own risk. The information herein does not constitute professional advice and is general in nature. We make no warranty that this information will meet your requirements, be safe, accurate, or error-free. Pipette Supplies, Inc. is not responsible for any errors or omissions, any results obtained from the use of this information, or any loss or damage arising out of the use of this information. This site is for educational purposes only.
Fair Use: Copyright Disclaimer under section 107 of the Copyright Act of 1976, allows for “fair use” for purposes such as comments, criticism, teaching, scholarship, news reporting, and research.
Fair use is permitted by copyright statute that might otherwise be infringing.


One of our Rainin pipette’s tip-ejector-sleeve became so loose that it just fell out every time when a tip is ejected. Is there a fix to this issue? We noticed the tip-ejector-sleeves become less tight over time and repeated cleaning and maintenance were done. There seems to have a slot for an o-ring at the tip of the tip-ejector-rod. Need some advice. The sleeve is in good shape and there is no cracks, but the rod just not holding the sleeve in place securely enough.
Hi Strong,
Great question! We’ll be reaching out via email to get more information.
Hello I am looking to get lubricant for our Rainin pipettes they were purchased early as 2019 and the model is Pipet-Lite XLS. I am just making sure I purchase the correct lubricant for the pipettes.
Hi Antonio,
Thank you for your comment. We will reach out via email to help!